IoT... Really?
OK, I know what you're thinking; "another IoT project? pls no", and I'd agree with you generally. IoT is a crowded space of generally useless projects. I've always been drawn to the concept of it though, managing a massive amount of small devices is a tough challenge and it's further complicated by the introduction of high latency, low bandwidth and low powered machine scenarios. Some of my first projects were in the IoT space, whether it be creating ccdocker, a docker clone for computercraft, or cswarm – a distributed scheduler for said project. There was just something always 'exciting' about working with machines at scale. Moving on from that I spent a bunch of time working with various Raspberry Pi based projects. FREEDOM – a open wifi access point I ran at The Nova Project, my high school, as a way to prevent content filtering employed by Seattle Public Schools (sorry, not sorry ;)) to later on adventures in creating an automatic Kubernetes cluster on top of Balena, my favorite IoT orchestration platform. It may be crowded space of useless projects, but there is some real value in the space.
The Struggle of Shipping Software
One of the best solutions to the problem of software distribution has been the introduction of Docker to manage, essentially, the entire stack of an application in one "bundle". Nowhere is the benefits of containers more recognized than in the IoT space. Balena helps enable this by bringing a platform to distribute container images and not have to worry about the host OS (in this case, balenaOS). This has made it a perfect choice for all of my IoT projects, and was naturally the platform I went with for the latest project I've been working on with a few friends.
For those of you who don't know what Balena is, it's essentially the "kubernetes of the IoT world". You provide manifests and docker images, they handle the distribution and machine access. You can get shells to machines behind NAT, a common scenario in the consumer IoT world, and metrics on the devices. Best of all, they have a generous free tier of 10 devices for any project. Perfect for small projects and startups.
As for the project we've started – I can't go too into detail about what the project is, I'm excited to share some of the underlying technology we've used in the creation of it thus far.
Our Problems
One of the most frustrating parts of software development today is fragmentation of how you ship your code. Generally you'll use Github, or some other VCS as your code storage. A CI provider to build/test/release your code. Potentially a different CD provider, sometimes the same as your CI if you're lucky, and then another platform to actually release your code. That's a lot of tools, which doesn't even account for other hosted services, like documentation servers and external linting platforms you might also use. Fragmentation increases the complexity of your development processes, and we really don't want that as a small group of individuals.
When Github first introduced Actions I was incredibly excited – this further placed Github as being the home for the entire development process. Then followed packages, which enabled you to store your container images and view them, all from Github. Combine that with Projects and Github checks and you've got yourself a solid platform. Unfortunately, Balena doesn't support using external images. Their free tier also doesn't have the fastest Docker builders, hey, you get what you pay for! For complex Go projects, or other host dependencies it can take awhile to get a Docker image built and deployed. This is problematic for quick iteration. Ultimately, my goals for the first iteration of the CI work for the project I started on was:
- Publish images to GHCR (GitHub Container Registry), so we can view them in Github
- Create a draft release in Balena on every PR, real release on every Github Release
- Keep image/deploy times to under 5 minutes.
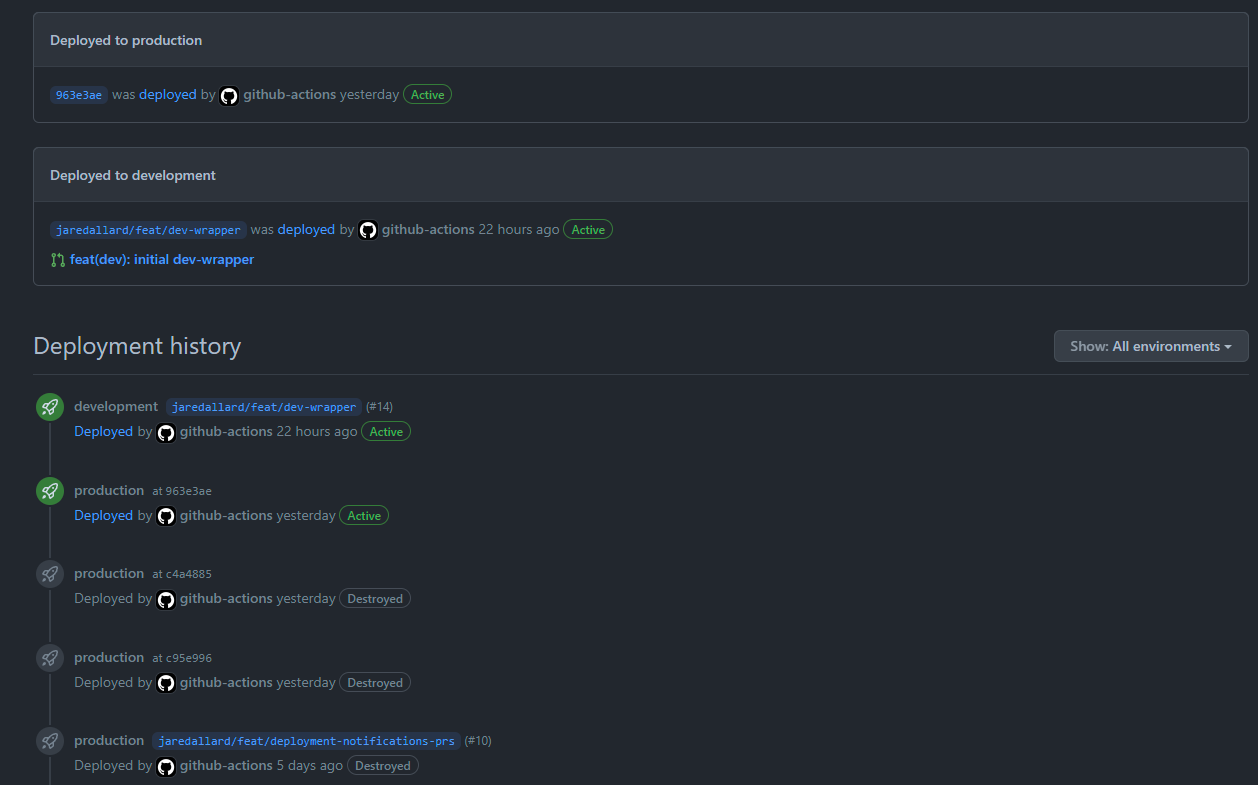
- Track deployments in Github's environments functionality
Publishing Docker Images
The first component was to design a system to publish docker images for ARM64. Usually I'd use something like docker buildx to emulate ARM64 to create docker images. This time I wanted to take a faster approach and instead use go's ability to cross compile a binary and inject it into a ARM64 container. This led to creation of our Dockerfile below:
This, combined with a Github action configured to publish on a Github Release:
# We still install / use buildx for the caching at the bottom.
- name: Set up Docker Buildx
  uses: docker/setup-buildx-action@v1
# This step generates the tags based on what's happen. For us this
# is SHA by default, and if on a tag we push the version up with a v
# prefix.
- name: Generate Docker Image Tag(s)
  id: meta
  uses: docker/metadata-action@v3
  with:
    images: ${{ env.DOCKER_REGISTRY }}/${{ env.IMAGE_NAME }}
    tags: |
      type=semver,pattern=v{{version}}
      type=sha
- name: Login to GHCR
  uses: docker/login-action@v1
  with:
    # This is just the github registry URL, ghcr.io
    registry: ${{ env.DOCKER_REGISTRY }}
    # This sets the username to whoever this github action token
    # is acting as.
    username: ${{ github.actor }}
    # This is provided by default in a Github action
    password: ${{ secrets.GITHUB_TOKEN  }}
- name: Build and Push Docker Image
  uses: docker/build-push-action@v2
  with:
    context: .
    push: true
    # Note: The cache-from/cache-to don't seem to actually do anything
    # benficial at the moment. This would, in theory, natively use th
    # github action cache to cache docker steps. One day? :D
    cache-from: type=gha
    cache-to: type=gha,mode=max
    tags: ${{ steps.meta.outputs.tags }}
    labels: ${{ steps.meta.outputs.labels }}
Partial of our Github Actions workflow for publishing to GHCR
This gets us images for every PR and release in Github – but it doesn't quite get us anywhere for balena. What's worse is that we've also just took a dependency on buildkit with the --mount steps in the Dockerfile, which Balena doesn't quite support.
Integrating with Balena
My, albeit hacky, solution to this was to create a separate Dockerfile.balena. This probably could be generated, but at the moment this contains the following:
We have a docker-compose.yml that's used by Balena to use that Dockerfile:
Using the --registry-secrets flag in balena push allows us to access GHCR from inside of Balena, this reduces our usage of their builders to just pull down an already built image from our registry. In our github actions workflow step from earlier, all we have to do to configure that VERSION variable that passes the docker image tag to use is:
- name: Configure Balena CLI
  run: |-
    DOCKER_TAG=$(awk -F ':' '{ print $2 }' <<<"$DOCKER_IMAGE" | head -n1)

    echo "Setting version in docker-compose ($DOCKER_TAG)"
    sed -i "s|{{ .VERSION }}|$DOCKER_TAG|" docker-compose.yml

    echo "Configuring GHCR access"
    cat >/tmp/image_pull_secrets.yaml <<EOF
    'ghcr.io':
      username: "$GITHUB_USER"
      password: "$GITHUB_TOKEN"
    EOF
  env:
    # This is a Github PAT from our CI user because currently
    # Github Action's token doesn't have access to Github Packages
    GITHUB_TOKEN: ${{ secrets.GH_PAT }}
    GITHUB_USER: ${{ github.actor }}
    DOCKER_IMAGE: ${{ steps.meta.outputs.tags }}
This step replaces {{ .VERSION }} with the docker tag we just built, and creates a balena --registry-secrets compliant file for use later when creating release automatically.
At this point we're now able to start pushing releases to Balena, automatically!
Continuous Delivery, with Balena
Now that we have setup access to GHCR from Balena, we're ready to push releases. At first I tried to use the balena provided Github Action (ADD LINK), but this currently doesn't support --registry-secrets and I wanted more control over how we call the balena CLI. So, instead I wrote this quick wrapper script:
This script essentially just calls balena push with different arguments based on if on a tag or PR. For PRs --draft is passed which creates a draft release in balena vs if on a tag, which omits that flag and creates a normal release.
- name: Deploy to Balena
  run: .github/workflows/scripts/deploy-to-balena.sh
  env:
    BALENA_TOKEN: ${{ secrets.BALENA_TOKEN }}
    FLEET: ${{ env.FLEET }}
This step is added to our Github Actions workflow from earlier, calling the script, and deploying our code to Balena automatically! For draft releases, we can manually pin a device to the version via the UI to test it, for non-draft release devices automatically get the latest version. This is done by creating a Github Release. We do this via semantic-release to enable automatic release creation based on conventional commit PR titles that are squash and merged. Our configuration for this can be seen at the end of this article in the Github Gist.
Tracking Deployments
Now that we've configured our CD pipeline, we had one last goal to achieve – tracking our deployments. While we get this for free in Balena, we really wanted to be able to view this in Github itself. For now we decided down the path of using a Github Action to do this in the balena deployment workflow. This was as easy adding the following:
# Start the deployment
- name: Update deployment status
  uses: bobheadxi/[email protected]
  id: deployment
  with:
    step: start
    token: ${{ secrets.GITHUB_TOKEN }}
    env: ${{ env.ENVIRONMENT }}
    ref: ${{ env.REF }}

### Steps to do deployment go here

# Finish the deployment status, notify github
- name: Finish deployment status
  uses: bobheadxi/[email protected]
  if: always()
  with:
    step: finish
    token: ${{ secrets.GITHUB_TOKEN }}
    status: ${{ job.status }}
    env: ${{ steps.deployment.outputs.env }}
    deployment_id: ${{ steps.deployment.outputs.deployment_id }}
This creates a deployment entry in the Github environments UI, like so:

This brought us to our goal! To recap we now have a development workflow of such:
- PR -> GHCR Image -> Balena draft release -> development environment status
- PR (merged) -> semantic-release -> Github Release -> GHCR Image -> Balena Release -> production environment status
This is an incredibly powerful automated CD platform for us and we're excited to move away from manual releasing and are incredibly happy with what Balena has provided us, even if batteries weren't included for our workflow. Instead of handling the complexity of upgrading the host OS and distributing the containers, we are able to simply able to just pass them a single Docker image and they take care of the rest!
That's it! If you're interested in seeing the files together, check out the Gist (link) for this article.


